Topside is a versatile and tasty cut of beef, but it can be a bit tough. The butcher’s job is to prepare the topside steaks so that they are easy to eat, says STEVE BAIN.
The cut known as the topside in Australia comes from an animal’s back end, high on the hindquarter.
The muscles in this region are well used and thus there is less fat (compared to, for example, a rib fillet) within the meat and enough connective tissue to make things a little chewy (yet flavoursome) unless the meat is cooked slowly (which ‘breaks down’ the collagen).
A handy hint when butchering a topside (aka top round in some parts of the world) many often leave as much fat on the roast as they can. This creates a self-basting effect when cooking in order to reduce drying out and maximising flavour.
The beauty of the topside cut of beef is that the kitchen can present a mid-priced meat offering, be it a roast or steaks, with heaps of flavour that marries well with a gravy or sauce.
A topside can be either roasted whole, cut into steaks, or trimmed into bite-sized pieces such as cubes for a braised dish or strips for stir-fry; there is also the popular option of mincing the cut (with added fat) to produce topside mince.
Typically the recommended cooking method for topside roasts and steaks is to cook them slowly at a medium temperature, often with the meat in at least a small amount of liquid and the dish covered.
An example of an exception is when stir-frying topside strips over high heat in a wok.
In this scenario the pieces are prepared bite-sized (so that no knife-work is required on the diner’s part) and the small strips although chewy, are very flavoursome. The secret here is that the pieces are cut to a size and shape that makes them easy to eat.
A topside steak on the other hand, if cooked quickly over high heat, would be difficult to eat and require a lot of sawing with a knife if cooked as quickly as you might cook a rib-eye. The end result of any aggressive sawing is likely to see peas and carrots spilling off one’s plate and all over the table.
Similarly, if inserted into a steak sandwich between the lettuce and tomato, the first bite into a quickly high-heat cooked topside steak that won’t tear, soon sees an embarrassing flap of meat hanging from one’s mouth while both hands contend with a bun or bread from which contents are spilling out down onto shirts and laps.
The typical approach, so as to avoid the aforementioned disasters, is to cook topside steaks ‘low and slow’ using a braising technique.
These steaks are often also cut thinly (thinner than you would cut a rib-eye) by the recipe-focused butcher to reduce the cooking duration.
Speaking of cutting, this is where the serrated ‘steak’ knife has its place at the dinner table. You may have also heard about the adage that steaks should be cut ‘across/against the grain’.
To see if there is a best side to cut steaks from, I have cut steaks off two adjacent sides/ends of a roast. Subsequent to them being braised by Lynn in her recipe, I’ll then make comment on the steaks’ ‘chewiness’.
My conclusions
Now for my thoughts on the comparison of the two cuts.
Firstly, the first cut (the one furthest from the knife in the Step 9 photo) definitely was more enjoyable to eat.
Secondly, however, in doing this comparison I reinforced an observation that I encountered many years ago — that is when studying a piece of meat (for example, the roast) like those in the shape of rounds, topsides and silversides — you may find that it can take a little bit of ‘testing for yourself’ before you are confident to predict which way to cut the steaks for the best result.
This is because the fibres in each roast need to be studied (and ideally tested) before you start ‘steaking’.
It isn’t always easy to see — I’ve seen people debate it and I’ve scratched my head a few times myself — in some cases you’ll find that there’s no better confirmation than cooking a test sample or three.
As an aside, if in doubt roast it as one piece. What we’ve shown here is that with topside steaks, you shouldn’t shy away from testing the options for yourself.
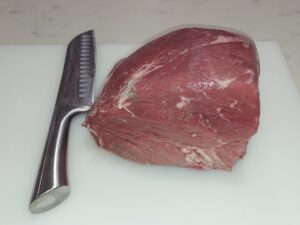
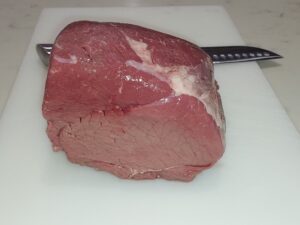
Step 1: Looking at a topside roast from one side (in this case this is the preferred side to cut steaks from).
Step 2: Looking at a topside roast from an adjacent side.
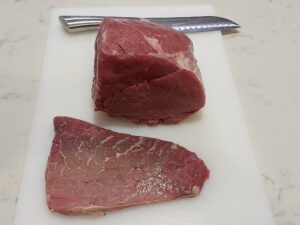
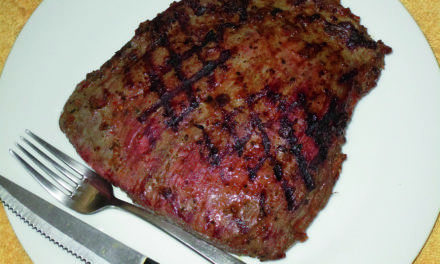
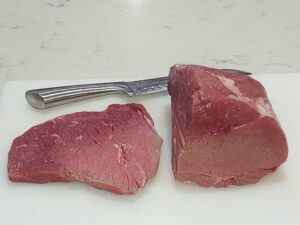
Step 3: A topside roast & a typical topside steak.
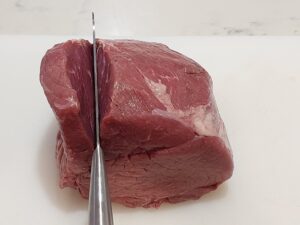
Step 4: Here we cut a steak from what was later determined to be the preferred end – this is about the right thinness for a steak that is to be braised for (approximately) an hour.
Step 5: Another view of the same cut – it helps to look at the piece of meat from a few different angles.
Step 6: The resulting preferred thin cut steak.
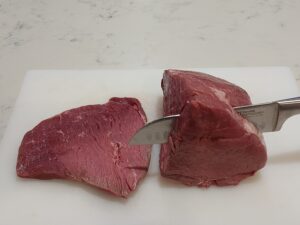
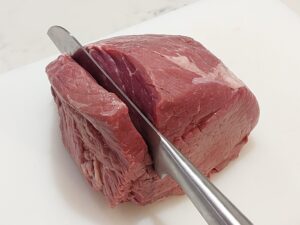
Step 7: Now we cut a steak of about the same thickness from the adjacent side.
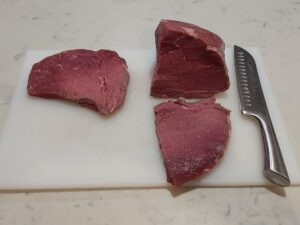
Step 8: The comparison opposite/adjacent steak.

Step 9: Study the photo(s) and see if you can see the difference between the steaks (the steak furthest from the knife in this photo is the one to put your money on, so to speak – rest assured it took a cooking test to determine this). It isn’t always easy to pick the meat that is going to eat the best. (I showed this photo to a few people and more guessed wrong than right – that’s not a criticism – it can be difficult at times – but there is a solution – read on (Compare the pair, Home cooking)